

Start in User Hub to set up your organization, manage users, and access the core administrative tools needed to launch your services.
Manage time schedules for a location
Schedules are used to support features like auto attendants. A schedule establishes a set of time slots in which a feature can execute specific behaviors. They are used to route incoming calls based on the day of the week and/or time of day. Schedules are classified as either Business Hours or Holiday.
Feature notes
- Schedule names and event names need to be unique.
- If you expect to treat all incoming calls in the same manner, regardless of day or time, configuring a time schedule is unnecessary.
- During a holiday schedule, callers are routed based on the after hours settings.
- Typically, upon installation of your service, two predefined schedules are set up and assigned to an auto attendant:
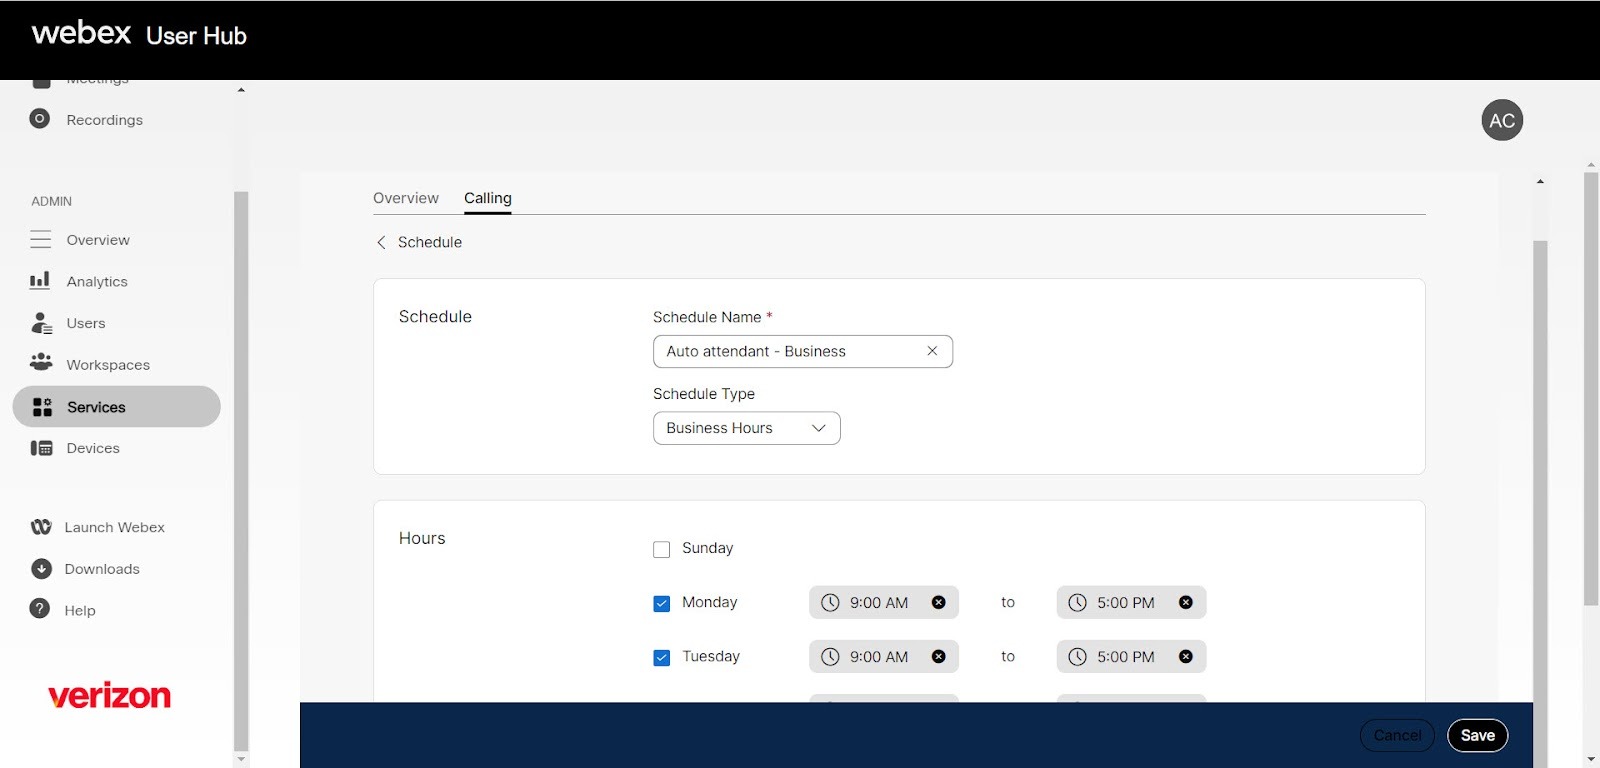
- Auto attendant – Business: This schedule defines the days and hours your office is taking phone calls.
Create a new schedule
- Log in to User Hub.
- Under Admin, in the left menu, select Overview.
- Select Locations.
- Select the location where you’d like to create a new schedule.
- Select Calling.
- Under Call features settings, select Schedules.
- Select Add Schedule.
- Enter the Schedule Name.
- Choose the schedule type - Business Hours or Holiday.
- For Business Hours, determine the schedule for your working hours during the day, and do the following:
- Select the days that your business is open.
- Specify the opening hours for each day.
- If your business has a lunch break, select the lunch break and edit the hours that apply to every business day.
- Select Save.
- For Holiday, create a schedule for specific days during the year when your organization is not open, and then do the following::
- Enter a Holiday Name.
- Select the Recurrence by choosing None, Weekly, or Yearly.
- If the holiday is an all-day event, check the box next to All Day.
- In Holiday Duration, select the Day or Date, and enter the details, depending on the recurrence.
- Select Save.
- For Business Hours, determine the schedule for your working hours during the day, and do the following:
Edit an auto attendant
An auto attendant routes calls to various destinations, including employees within your company, specific employee groups, voicemail, or other outside numbers. It provides callers with your company greeting and dialing menu options.
If your order included an Auto Attendant, it has already been created in User Hub with a phone number assigned. Use the steps below to update its settings, such as its greeting, dialing menu, or schedule.
You can use an existing business hours and holiday schedule to configure the time/days your auto attendant is operational and non-operational, or create a new schedule when you create an auto attendant. To configure your business hours and holiday schedules in advance of creating an auto attendant, see Manage time schedules for more information.
- Log in to User Hub.
- Under Admin, in the left menu, select Services.
- Select Call features and then Auto Attendant.
- Select Manage, then choose the existing auto attendant you want to update..
- On the Basics screen, enter the following information:
- Location - Where you would like to assign this auto attendant.
- Auto Attendant Name - This is used to identify the auto attendant later on.
- Phone Number and/or Extension
- Language - Used for audio announcements for this auto .
- Caller ID - The caller ID is used for calls that are forwarded outside of the auto attendant.
- Select Next.
- On the Business Schedule screen, select the business hours schedule to assign this auto attendant. Or, you can Create a new schedule.
- Select Next.
- On the Holiday Schedule page, select the holiday schedule to assign this auto attendant. Or, you can Create a new schedule.
- Select Next.
- On the Menu screen, determine the dialing menu options on both the Business Hours and After Hours tabs. Use the drop-down menu to assign each keypad number a function. Options include:
- Not used - This is the default when an action has not been selected for that digit or character.
- Play announcement - Use this functionality to select, upload, or record an announcement at the location or at the organization level and play the same.
- Transfer call with prompt - This action routes callers to a phone number that is not a user or extension within the company. For example: A third-party answering service or corporate call center. With this option, callers will hear a prompt telling them that they are being transferred.
- Transfer call without prompt - This action routes callers to a phone number that is not a user or extension within the company. For example: A third-party answering service or corporate call center. With this option, callers will not hear a prompt telling them that they are being transferred.
- Transfer call to operator - This action redirects callers who do not choose an option from the auto attendant dialing menu (or “time out”) to a configured operator. If you chose to enable this action, enter the phone number to which to route callers. Note: This action must be assigned to a key before the “time out” function is supported. When enabled, the caller will be transferred to the configured number when the key assigned is pressed or if no keys are hit after 10 seconds, which is the “time out” period.
- Transfer call to voicemail - This selection places callers directly into the voicemail box of the phone number or extension entered.
- Dial by name - This action permits callers to dial by recipient name, using the letters on the keypad.
- Dial by extension - This action lets callers dial by recipient extension, using the numbers on the keypad.
- Repeat menu - If selected, this action will repeat the greeting and menu options.
- Exit menu - This action allows callers to exit the menu system. This will terminate the call.
- To allow callers to dial an extension without a menu prompt, check the box next to Enable extension dialing without requiring a menu item.
- Select the options for menu timeout and repeat configuration when there is no input or when there is an invalid input from the caller:
- No input timer - Enter the number of seconds the system will wait for the caller to provide input (60-second maximum).
- Repeat on no input - Choose to repeat 1-3 times, or not repeat if there is no input from the caller.
- Action after all repeat attempts - Choose an action.
- Message settings - Select play default or custom message. If choosing custom, upload a .WAV file.
- Select Next.
The following will happen when zero (0) is, or is not, set up when a caller calls into the auto attendant:
- If zero (0) is set up and the caller dials zero (0), the action is performed as assigned.
- If zero (0) is not set up and the caller dials zero (0), nothing happens and the call is disconnected.
- If zero (0) is set up and the caller does nothing, after several seconds, the following message is played: “Your call cannot be transferred. Please try again later.”
- If zero (0) is not set up and the caller does nothing, the call is simply disconnected.
- On the Greeting page, select the greetings (announcements) that will be placed for both Business Hours and After Hours. You can choose to play the default greeting, upload an audio recording, or record your own greeting. See Create and manage announcement files for more information. Once your selections are made, select Next.
- Review and select Create to save.
- When complete, select Done.
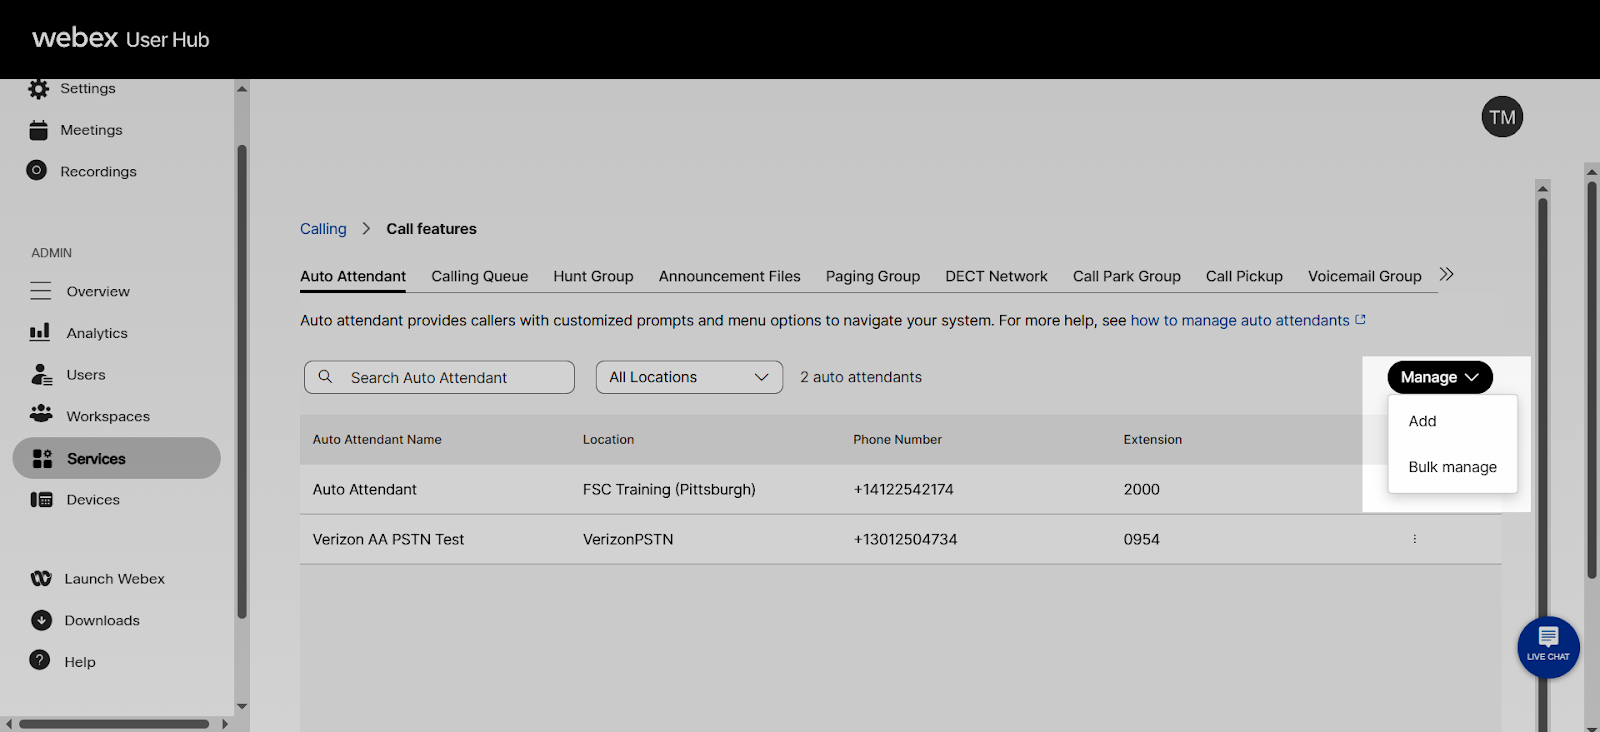
Need an additional auto attendant? If your organization requires a new, separate auto attendant beyond the one created with your order, select Manage > Add on the Auto Attendant page and follow the on-screen setup wizard (Basics, Schedules, Menu, Greeting) to create it.
Edit a hunt group
A hunt group is used to ring specific groups of users in a predetermined pattern within or across locations when a call is made to the hunt group telephone number.
If your order included a Hunt Group, it has already been created in User Hub with a phone number assigned. Use the steps below to update its call routing, agents, or other settings.
- Log in to User Hub.
- Under Admin, in the left menu, select Services.
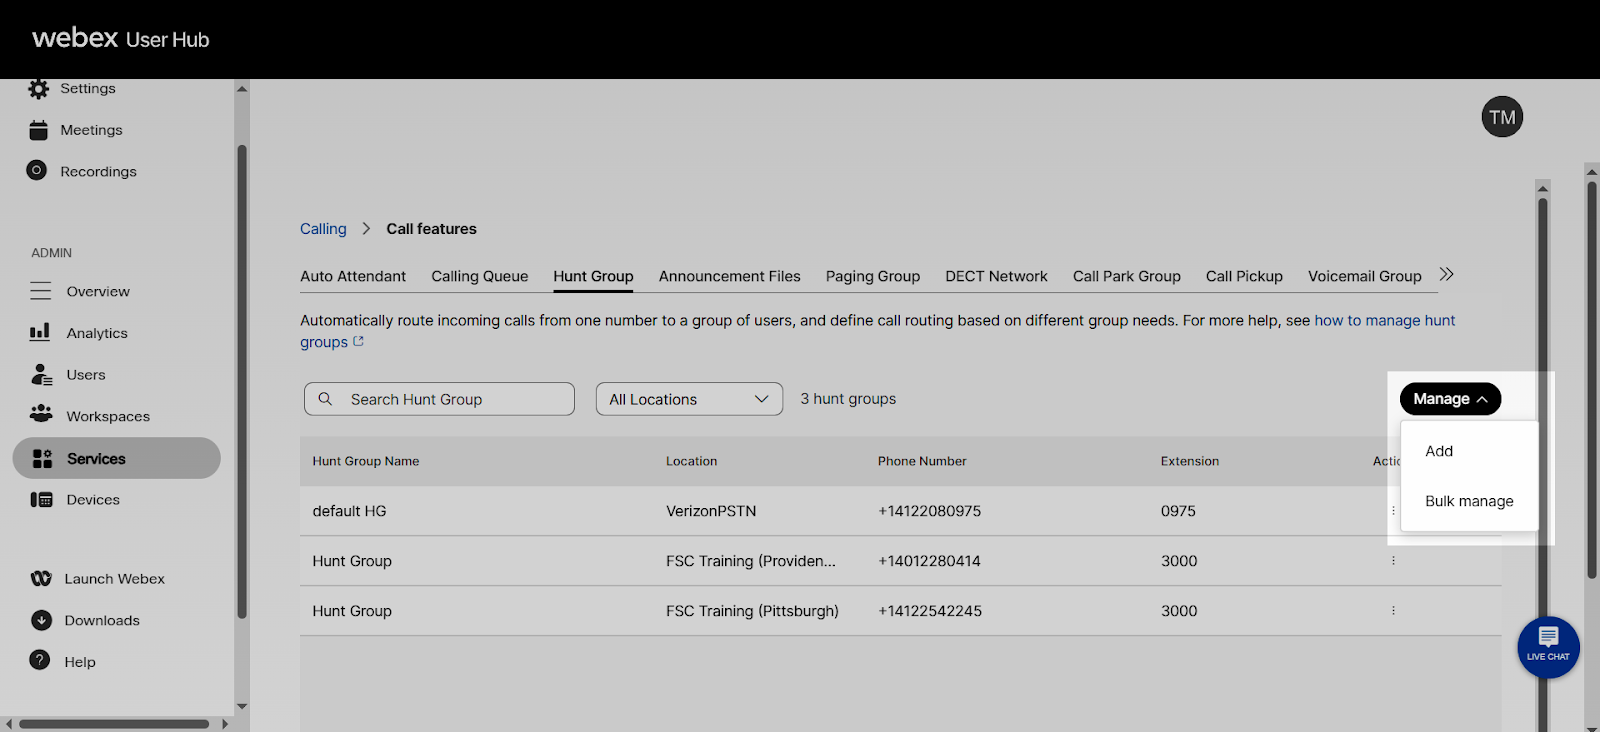
- Select Call features and then select the Hunt Group tab.
- Select Manage then choose the existing hunt group you want to update.
- On the Basics page, enter the following information:
- Location - Where you would like to assign this hunt group.
- Hunt Group Name - This is used to identify the hunt group later on.
- Phone Number and/or Extension
- Caller ID - The caller ID is used for calls that are forwarded outside of the hunt group. If applicable, you can enable Allow agents to use hunt group number as caller ID.
- Language - Used for audio announcements for this hunt group.
- Click Next.
- On the Call Routing page, choose the call routing to assign to the hunt group:
- Circular - Sends calls to users one-at-a-time, always ringing the users in the same order.
- Top Down - Sends the calls through the queue of members in order, starting from the top each time.
- Longest Idle - Sends calls to the user who has been idle (that is, not on a hunt group call) the longest.
- Weighted - Sends calls to idle members based on percentages you assign to each member of the hunt group (up to 100 percent).
- Simultaneous - Sends calls to all members assigned to the hunt group at once.
- Toggle on Advance after a set number of rings and enter the number of rings to apply to your call routing choice, if needed.
- Click Next.
- On the Routing Settings page, you can enable one or more of the additional call routing settings. Click Next.
- On the Select Agents page, you can select the users or workspaces you would like to assign to this hunt group. Make your selection and click Next.
- Review your hunt group settings and click Create to confirm and save.
Add a device
Administrators can add, assign, and maintain an inventory of phones and devices for users in User Hub.
- Log in to User Hub.
- Under Admin, in the left menu, select Devices.
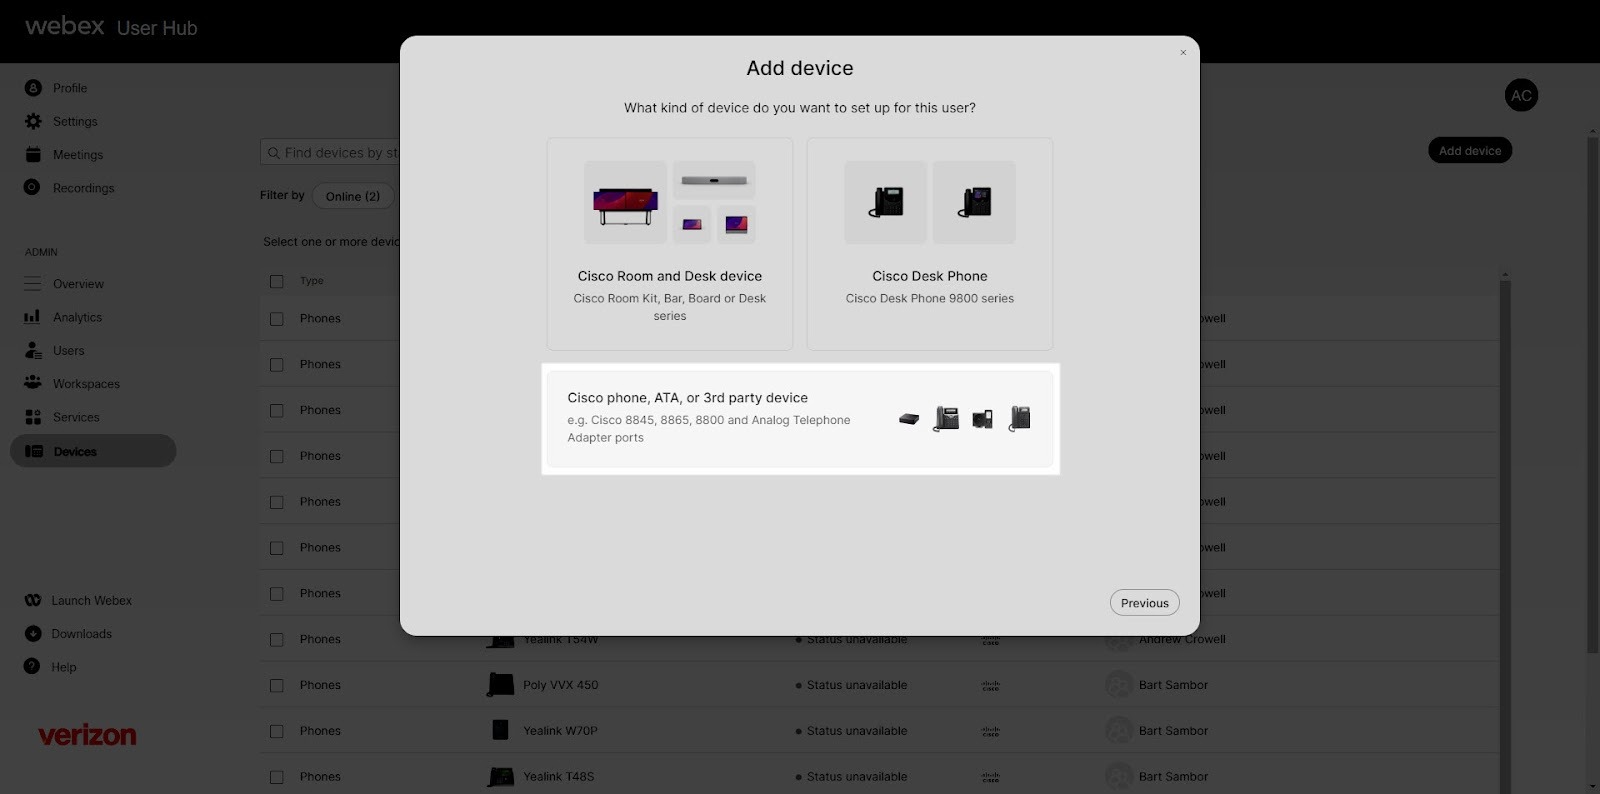
- Click Add device.
- Select Personal usage and click Next.
- Select a User from the drop-down menu and click Next.
- To add a third-party device, select Cisco phone, ATA, or 3rd party device.
- From the Select device drop-down menu, choose Cisco Managed 3rd Party Devices.
- Choose the Device Vendor.
- Next, enter the MAC address.
- Click Save.
For additional details on configuring Multiple Line Appearance and Shared Line Appearance, refer to the corresponding guides for each feature.
Enhanced 911 (E911) emergency services
The Enhanced Emergency (E911) service for Business Digital Voice with Webex supports organizations with hybrid or nomadic workforces by providing dynamic location capabilities and routing emergency calls to Public Safety Answering Points (PSAPs) across the U.S., its territories, and Canada. The service includes the RedSky Horizon Mobility emergency call management portal and an integration point within User Hub.
Important: Federal law requires organizations operating voice systems with movable or “nomadic” lines to automatically deliver a caller’s dispatchable location to 9-1-1 operators so first responders can quickly locate the caller. Learn more about this regulation and available emergency service options here.
Explore the following resources for more information about configuring and managing E911 services.
- Configure E911 services ↗
- Manage emergency call notifications ↗
- Configure an emergency callback number ↗
Manage voicemail settings for a user
Administrators can enable and configure voicemail settings and notifications for users. The voicemail settings and features allow users to retrieve voice messages by email or text. Voicemails are sent in a .wav format.
Setup voicemail
- Log in to User Hub.
- Under Admin, in the left menu, select Users.
- Select the user you’d like to modify.
- Select Calling.
- Scroll down to Voicemail, fax, announcement language and timezone and select Voicemail.
- Select the toggle to enable.
- Choose when to send calls to voicemail. Options include:
- Send all incoming calls to voicemail - Select this option to have all calls sent to voicemail.
- Send calls to voicemail during a busy line - Select this option to set up voicemail when the line is busy.
- Choose the message file to play, or upload a new file. Note: If uploading a new file to be used as the voicemail message, it must meet the following requirements: 8 or 16 khz, 8 or 16 bit, monou-law, A-law, or PCM, CCITT u-law, 2 MB max, .wav file format.
- Send calls to voicemail when unanswered - Select this option to set up voicemail for when a call exceeds a set number of rings.
- Set the number of rings. Once a call exceeds this number of rings, the call is sent to voicemail.
- Choose the message file to play, or upload a new file. Note: If uploading a new file to be used as the voicemail message, it must meet the following requirements: 8 Khz, 8 bit mono, CCITT u-law, 4.6MB max, .wav file format.
- (Optional) Enable Transfer on “0” to another line. Once selected, enter the phone number to forward the calls to.
If this option is selected, make sure the voicemail greeting informs the callers that pressing ‘0’ will transfer them.
- (Optional) Enable Email a copy of voicemail message. This option sends a recording of all voicemails to the email address entered. Once selected, enter the email address to send the messages to.
- Click Save.
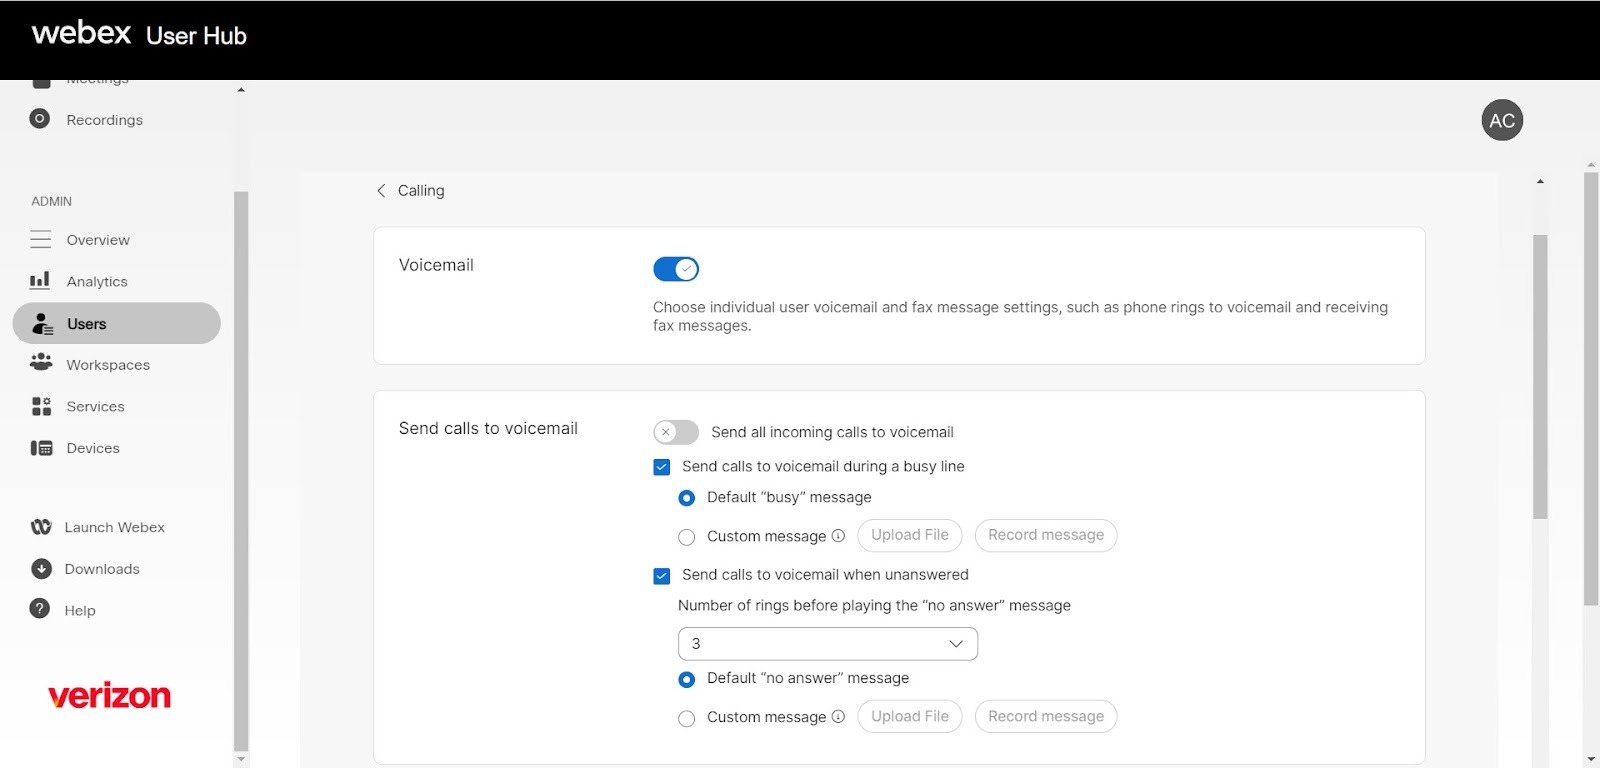
In addition to enabling voicemail for a user, administrators can also manage settings such as resetting or setting a temporary voicemail PIN, enabling voicemail notifications, and configuring voicemail message storage.
User Hub provides access to interactive data visualizations that show important information, such as usage and adoption trends. Data automatically adapts to parameters that you specify in real-time, and graphs update dynamically as you explore the dashboard.
Tips for using the Analytics dashboard
- Adjust time period: View Total Call Legs and Total Call Minutes by day, week, or month to track usage trends and monitor platform adoption over time.
- Use filters: Apply filters on the Detailed Call History page to focus on specific data. Clear filters individually by clicking the close button.
- Export data or charts: Download graphs or detailed views as PDF, PNG, or CSV using the More button. Combined with filtering and sorting, this makes it easy to generate custom reports.
- Information icons: Hover over the info icons to understand what each chart measures and gain additional insights.
Access your analytics
- Log in to User Hub.
- Under Admin, in the left menu, select Analytics.
- View My Dashboards or Detailed call history.
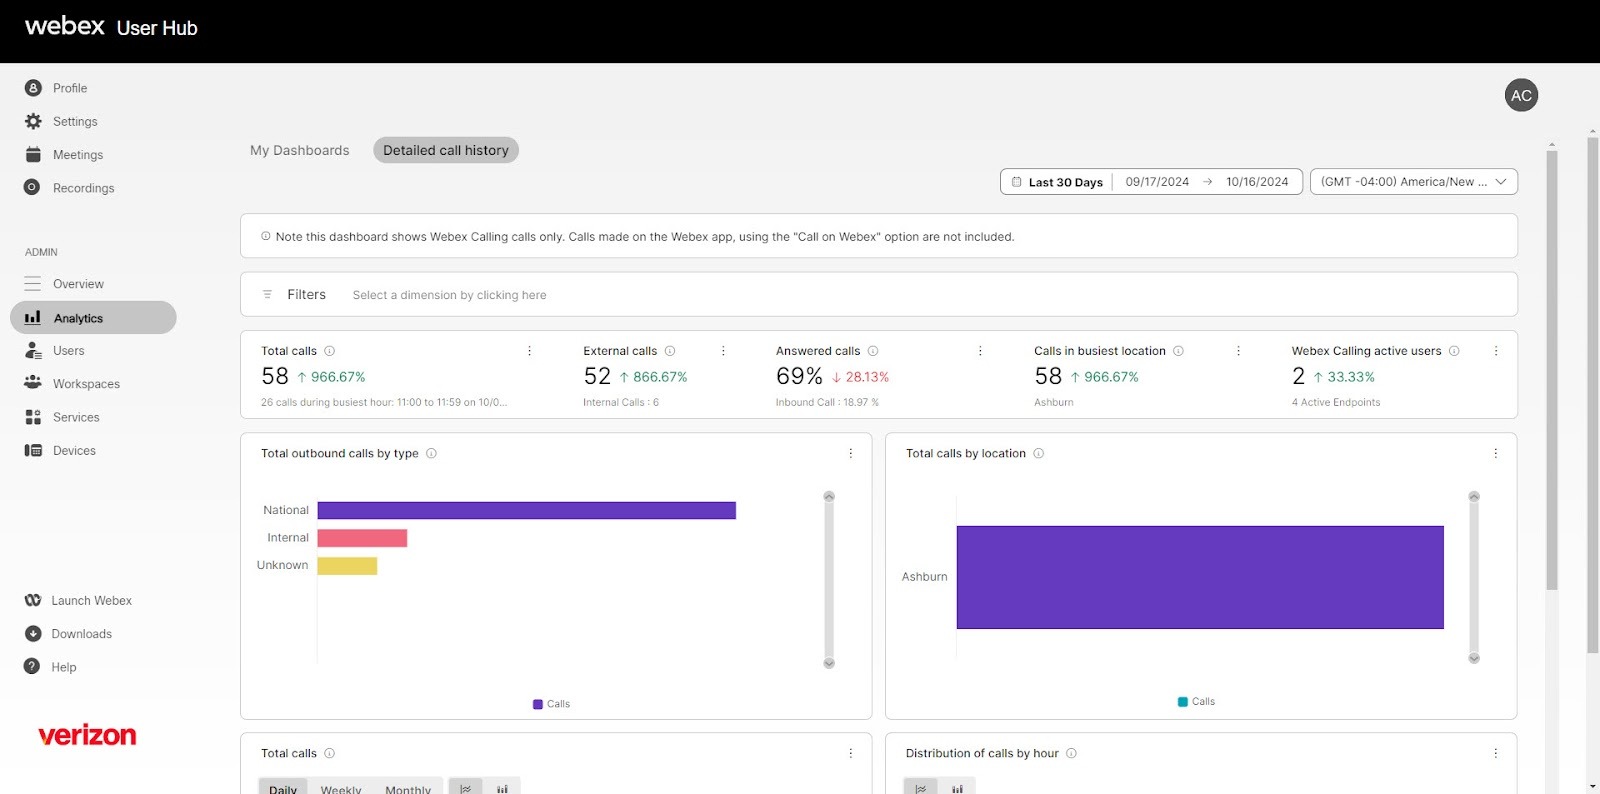
To learn how to create a custom analytics dashboard tailored to your needs, see this step-by-step guide: Create a custom dashboard.